Best for learning the layout
Labeled shirt template
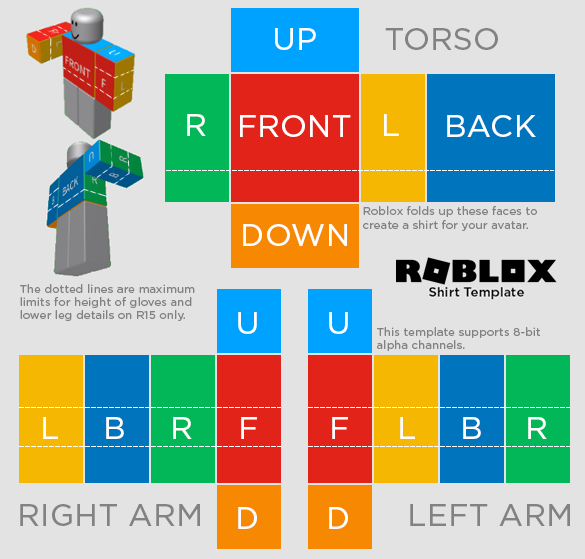
Colored labels show which rectangles wrap around the torso and arms. Start here if this is your first Classic Shirt.
Download labeled PNGDownload the labeled template to learn the layout, or start with the clean PNG if you already know where each part goes. Keep the image at 585 x 559 pixels so it fits a Roblox Classic Shirt correctly.
Keep these exact dimensions when you save the finished shirt.
PNG keeps sharp edges and supports transparent areas.
This template covers the torso and both arms.
Choose your file
Use the labeled image to understand the layout. Use the clean image when you are ready to draw.
Colored labels show which rectangles wrap around the torso and arms. Start here if this is your first Classic Shirt.
Download labeled PNG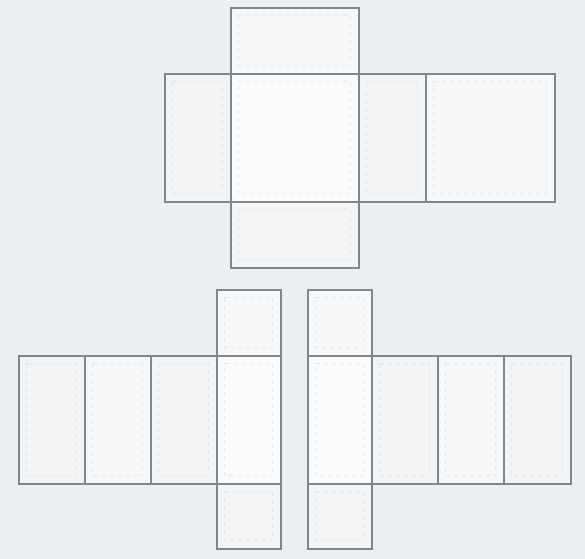
A clean working file with outlines and no colored labels. Use it when you are ready to draw your shirt artwork.
Download clean PNGMake your shirt
Choose the labeled version for guidance or the clean version for drawing. Open the PNG in an editor that supports layers and transparency.
Place the collar, buttons, logo, or jacket details on the front of the torso. Add the matching design to the back and sides.
Fill the left and right arm sections. Keep stripes, cuffs, and patterns aligned where the arm faces meet.
Zoom in and compare touching edges. Continue colors and lines across each seam so the finished shirt looks connected.
Export at exactly 585 x 559 pixels. Preview the shirt on an avatar and correct any misplaced or stretched details before uploading it to Roblox.
The colored faces on the labeled template show how a flat image wraps around the body.
The large FRONT panel covers the torso. The smaller F panels cover the fronts of the arms.
Keep important details away from the outer edges so they do not disappear around the sides.
The large BACK panel covers the torso. The smaller B panels cover the backs of the arms.
Match the top and side edges with the nearby torso faces.
L marks the left-facing side of the torso or arm after the template wraps around the avatar.
Continue the color or pattern from the front and back edges.
R marks the right-facing side of the torso or arm after the template wraps around the avatar.
Check L and R before adding one-sided details such as a sleeve badge.
The top faces sit across the shoulders and at the upper ends of the arms.
Use the same base color as the nearby front, back, and side faces unless the design needs a shoulder detail.
The bottom faces sit under the torso and at the lower ends of the arms.
Fill these faces so the shirt does not show an unexpected blank area from below.
Cropping or resizing the canvas can move every body section out of place.
Return the canvas to 585 x 559 pixels and keep the template in its original position.
The colored labels are useful while drawing but will show on the avatar if they remain visible.
Draw on a separate layer, then hide or remove the labeled template layer before saving.
A design may look complete from the front while showing empty strips around the torso or arms.
Fill every face and carry background colors across the connecting edges.
Text and small details can bend or split when they cross from one body face to another.
Keep important artwork inside one face and preview it from several angles.
A flattened PNG is harder to adjust when a sleeve or seam needs a small correction.
Keep a layered project file and export a separate PNG for Roblox.
Quick answers
Use a 585 x 559 pixel image. Keep that exact canvas size when you export the finished PNG.
Use the labeled template to identify each body face. Use the clean outlined template as the base for your finished artwork.
Save the finished shirt as a PNG. This keeps edges clear and preserves any transparent parts of the image.
No. A Classic Shirt wraps around the torso and arms. A Classic T-Shirt is a square image placed on the front of the torso and does not use this full template.
Some template faces wrap around the body in opposite directions. Check the labels for the left and right arms, then preview any text or symbols before uploading.
You can place artwork on the template, but do not stretch a completed image into the template size. Start with the full 585 x 559 canvas so every section stays aligned.
Keep creating